Hello 👋. May I request you to write this prompt into your ChatGPT console and see what do you get?
My friend is coming from Thailand. Can you please track the flight from Bangkok to Sydney? Also, considering the weather right now, can you suggest me some good thai food places?
The response you will get is going to be similar to what I got here.
[iheu_ultimate_oxi id="7"]
It's because free version of ChatGPT is not connected to the internet. If you have got a ChatGPT Plus subscription or if you want to use Microsoft Copilot or Google Gemini you will get much better results. This is good for yourself but may not be good for your customers. Why? Because you do not have any control on this, as when and what services to call. Let's tackle these problems ourselves and create something interesting for our businesses and customers.
Hint: You can try to swipe right to the above image to see how we're going to build it.
What are we doing here? 🤷♂️
If 2006 is to Developers, Developers, Developers then 2024 is all about Copilots, Copilots and Copilots. Every single product within Microsoft ecosystem is chanting it loud. Very loud! While there are multiple ways to achieve your Copilot goals, I thought to start with a pro-code way. A way which gives developers more power, efficiency and scalable way of staying on top of the Copilot stack. Well, technically at the orchestration layer of the stack.
This post focuses on creating your own Copilot with Semantic Kernel powered by Azure OpenAI Service. We will try to leverage the strength of Large Language Models (LLMs) with the integration of external services. This will give you an idea on how you can really achieve your Copilot goals with not just with retail but with any industry, be it Power & Utilities, Government and Public Sector and so on.
I am deliberately refraining from using the term 'chatbot' as opposed to Copilot because of its overall capability and potential use-cases.
Vanilla Copilot
Let's start with building a basic chat client with Semantic Kernel. This is really simple because all you have to do is to create a kernel with AddAzureOpenAIChatCompletion class and provide a system prompt with some boilerplate code. After providing the endpoint and API key (which I stored in my Environment Variables), you build the kernel, provide a system prompt with a loop that calls Azure OpenAI Service with streaming. This loop does not break because it's just a never-ending chatbot. However, you may want to build your own logic around that as when you want to stop it.
Now if you just take this file, replace it with your own Program.cs in the Console Application and provide necessary configuration, it should just work like ChatGPT (well, because we're using the same model 😉).
So, until now, it's the same demo(s) you may have seen on the internet to show you how you can use Azure OpenAI Service (or broadly OpenAI) API and enhance your business capability. Let's add some colors to it. Ask the same Copilot (i.e. ChatGPT clone), What's the time right now?
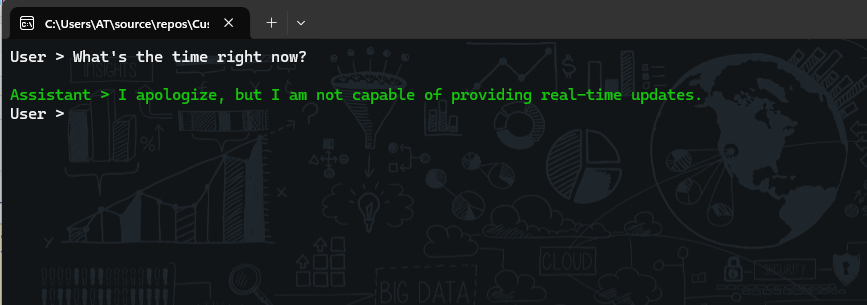
This is where things are going to start interesting. Did you know that the current enterprise LLMs are bad at telling you times, solving complex mathematical problems and keeping you posted with the facts (simply because they are not connected to the internet, by default).
Plugins to the rescue
In my recent post, I have already explained the necessary concepts and features of Semantic Kernel such as AI Plugins, Native Functions, Prompts and so on. Therefore, I won't be diving into too much of a detail, but I will just briefly explain here. Additionally, one of my good friends Will Velida has started a video series about Semantic Kernel on his YouTube channel which I think is really good and can teach you so many new things. Check it out.
Plugins are a way to add functionality and capabilities to your AI Copilots (or Agents). They are now based on the OpenAI plugin specification (thanks to the awesome SK team), which means they can interoperate with other AI platforms like ChatGPT, Microsoft 365 and so on. Plugins can contain both native code (such as C# or Python) and prompts (such as requests to AI services). You can use plugins to access data, perform operations or augment your agent with other AI models. For example, you can create a plugin that can search the web, send emails, generate images or use even Microsoft Word (You can't just do this with the chatbot, can you?). Plugins are like the “arms and hands” of your AI app, allowing it to interact with the real world.
Out of the box plugins
Another great thing about Semantic Kernel plugins is that some of them have been shipped by the team as a separate package. This means, you do not have to write all of your own, rather you can utilise some of the built-in ones too. For example, in our case, we'll be using the TimePlugin to solve this problem.
All you have to do is to write this line of code and you're covered. This is extremely simple, easy and pluggable (hence the name, plugin).
// Create a kernel with the Azure OpenAI chat completion service
 var builder = Kernel.CreateBuilder();
 builder.AddAzureOpenAIChatCompletion("gpt-35-turbo-16k",
     GetEnvironmentVariable("AOI_ENDPOINT_SWDN")!,
     GetEnvironmentVariable("AOI_KEY_SWDN")!);

 // Load the plugins
 // add this namespace to use OOB plugins Microsoft.SemanticKernel.Plugins.Core;
 #pragma warning disable SKEXP0050
 builder.Plugins.AddFromType<TimePlugin>();

 // Build the kernel
 var kernel = builder.Build();
Automatic Function Calling
After adding the above code, here comes a little challenge for the Kernel. How would it know that I need to run TimePlugin when user asks about Time vs. the usual ChatGPT response? Broadly, there are two ways to handle this challenge.
- Get all the functions you registered yourself with the Plugin (in our case,
TimePlugin) and invoke the Function yourself (I have slightly covered this process here) manually. - Use auto function invocation feature of the Kernel (super cool and you will know why!)
So, we'll be going with the auto function calling and to enable that, all you need is a single line of code. Inside your while loop, you just have to set a ToolCallBehavior property.
// Get user input
Console.ForegroundColor = ConsoleColor.White;
Console.Write("User > ");
history.AddUserMessage(Console.ReadLine()!);

// Enable auto function calling
OpenAIPromptExecutionSettings openAIPromptExecutionSettings = new()
{
    MaxTokens = 200,
    ToolCallBehavior = ToolCallBehavior.AutoInvokeKernelFunctions
};
There's another way to achieve your goals in Semantic Kernel and that's through Planners. However, I will be saving that topic for my upcoming posts with relevant examples.
After you add ToolCallBehavior and also add the TimePlugin, you can run your app and should see the output like this.
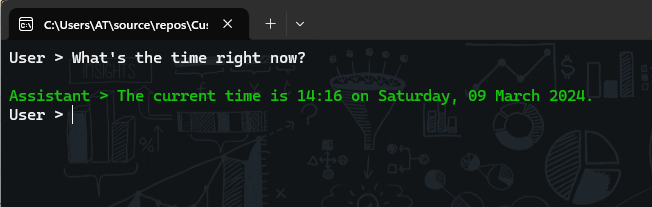
This works as expected. However, our goal is to create a Retail Copilot. A copilot where we will add 3 distinct features on top of the strength of LLMs.
Retail Copilot
For the context of our copilot, we'll add 3 features (or you can also say Plugins). Each plugin will have its own significance and will be independent. This means that it can be added or removed based upon our needs without modifying a lot of code. This pluggable nature of the Copilot keeps our solution clean and managed. Here are the feature details:
- Flight Tracking
- Weather Radar
- Retail Finder
We will now create a Plugin for each feature. To create a plugin, you need to define a group of functions (or a single function) that can be exposed to AI apps and services. Each function should have a semantic description that explains what it does, what its input and output are and what side effects it may have i.e. what's happening inside the function with its return value. This helps the AI understand how to use your plugin and plan the best way to achieve the user’s goal. You can also specify a persona for your plugin, which defines how your plugin should behave and communicate with the user. For example, you can make your plugin snarky, careful or friendly.
Flight Tracker
This plugin will be using Aviation Stack API (free plan) to get the details of the flight. For free version, there's a requirement that you either provide an IATA flight code (for example, EK 414) or you provide the IATA source name (such as DXB / LHE) and IATA destination name. Initially, I thought we would have to write 2 functions, one is to get the IATA names for example SYD for Sydney as the API expects it. Otherwise, you won't be able to get the right response. Just check the below screenshot, you can see that I provided dep_iata as Dubai and arr_iata as Sydney. It did not return anything. However, when I changed it to the actual codes, it returned the correct response. Check this out below:
[iheu_ultimate_oxi id="3"]
My most favorite part: Semantic Descriptions
It is evident that you can't really get any response from the API unless you provide the correct IATA code names but interestingly, that's not the case. With the power of Semantic Descriptions of the function, it takes the power of both LLMs as well as the code we write to bring you the best results. Here's what I wrote for Flight Tracker:
This is just one class, one function. This means, a single plugin with just one native function. If you notice, from the definition to its parameters to its return value, I have provided Description for almost everything in this function. The reason for these semantic descriptions is that Semantic Kernel will effectively use AI to process the request. That's why, if you notice source and destination, I have written IATA code for the source / destination location respectively. By just giving this description, without the need of calling a separate service to resolve the city name, in our example Sydney, it can automatically convert it to SYD. This is the amazing feature for me!
Once you're done with your Plugin class, all you have to do is to go back to your Program.cs file and add this plugin right after the TimePlugin. Here's the code snippet for this:
builder.Plugins.AddFromObject(new FlightTrackerPlugin(GetEnvironmentVariable("AVIATIONSTACK_KEY")!), nameof(FlightTrackerPlugin));
After adding this line of code. My suggestion is to change the system prompt to You're a virtual assistant that helps people track flight and find information. Execute and see if you get the similar response to this:
[iheu_ultimate_oxi id="4"]
Now you can easily witness that our Copilot has already started taking a shape by interacting with the right plugin and also giving us the expected responses.
Weather Radar
Just like the Flight Tracker Plugin, you will write the Weather Plugin. This plugin will be using the Weather API which is also free and very easy to use. I created a separate class file where I created a single function to get the weather.
Following the above practice, you will just have to inject it writing the below line of code:
builder.Plugins.AddFromObject(new WeatherPlugin(GetEnvironmentVariable("WEATHERAPI_KEY")!), nameof(WeatherPlugin));
Now if you run it again, you will be able to see the weather coming up. This is because your Copilot is interacting with the external services now. Just like Microsoft Copilot Chat (or Bing Chat) 😉
[iheu_ultimate_oxi id="5"]
Retail Finder
Similar to the above, we'll now be writing a Places Suggestion Plugin. This plugin will be using the Azure Maps (or Bing Maps API) to locate our desired places. It is also worth noting that changing System Message will have a greater impact. So let's change your existing system message to this:
You're a virtual assistant responsible for only flight tracking, weather updates and finding out the right places within Australia after inquiring about the proximity or city. You should not talk anything outside of your scope. Your response should be very concise and to the point. For each correct answer, you will get some $10 from me as a reward. Be nice with people.
I personally believe that Google Maps API does a far better jobs at this, but their API model sucks as they do not provide a free tier even for dev purposes.
This is how your Plugin code should look like.
Now, you can just add this line of code to your existing Copilot code and it should just start working fine.
builder.Plugins.AddFromObject(new PlaceSuggestionsPlugin(GetEnvironmentVariable("AZUREMAPS_SUBSCRIPTION_KEY")!), nameof(PlaceSuggestionsPlugin));
Launch your console app again and now you should see something similar to this:
[iheu_ultimate_oxi id="6"]
Bringing it all together
By now, you must have seen individual cases of your Copilot and they just work fine with external sources. Now, let's combine all of them together and try to ask something that'd call all of your custom Plugins as well as use the power of LLMs.

Congratulations! You've built your Copilot which is lightweight, independent of various plugins and also can be surfaced at any channel using different frameworks. It would be great to know about your use-case and how you would like to use Semantic Kernel and Azure OpenAI Service.
To conclude my longest post of this year, what does it mean to create a custom retail copilot with Semantic Kernel and Azure OpenAI Service? It means to harness the power of AI to augment our human capabilities and enrich our experiences. It means to bridge the gap between natural and formal languages, between human and machine intelligence, between local and global knowledge. It means to explore the possibilities of AI-First apps that can interact with a variety of services and domains. I have tried my best to share my journey of building such a copilot using Semantic Kernel as a flexible, lightweight and expressive framework with Azure OpenAI Service as a scalable and robust platform. If you have found this guide inspiring and useful then share this among your circles.
Until next time.