Last week my level of excitement just went up to another level when I got an access to OpenAI's API. The API features a powerful general purpose language model, GPT-3, and has received tens of thousands of applications to date. The main reason for my excitement was to explore what it has to offer in regards to the conversational AI capabilities.
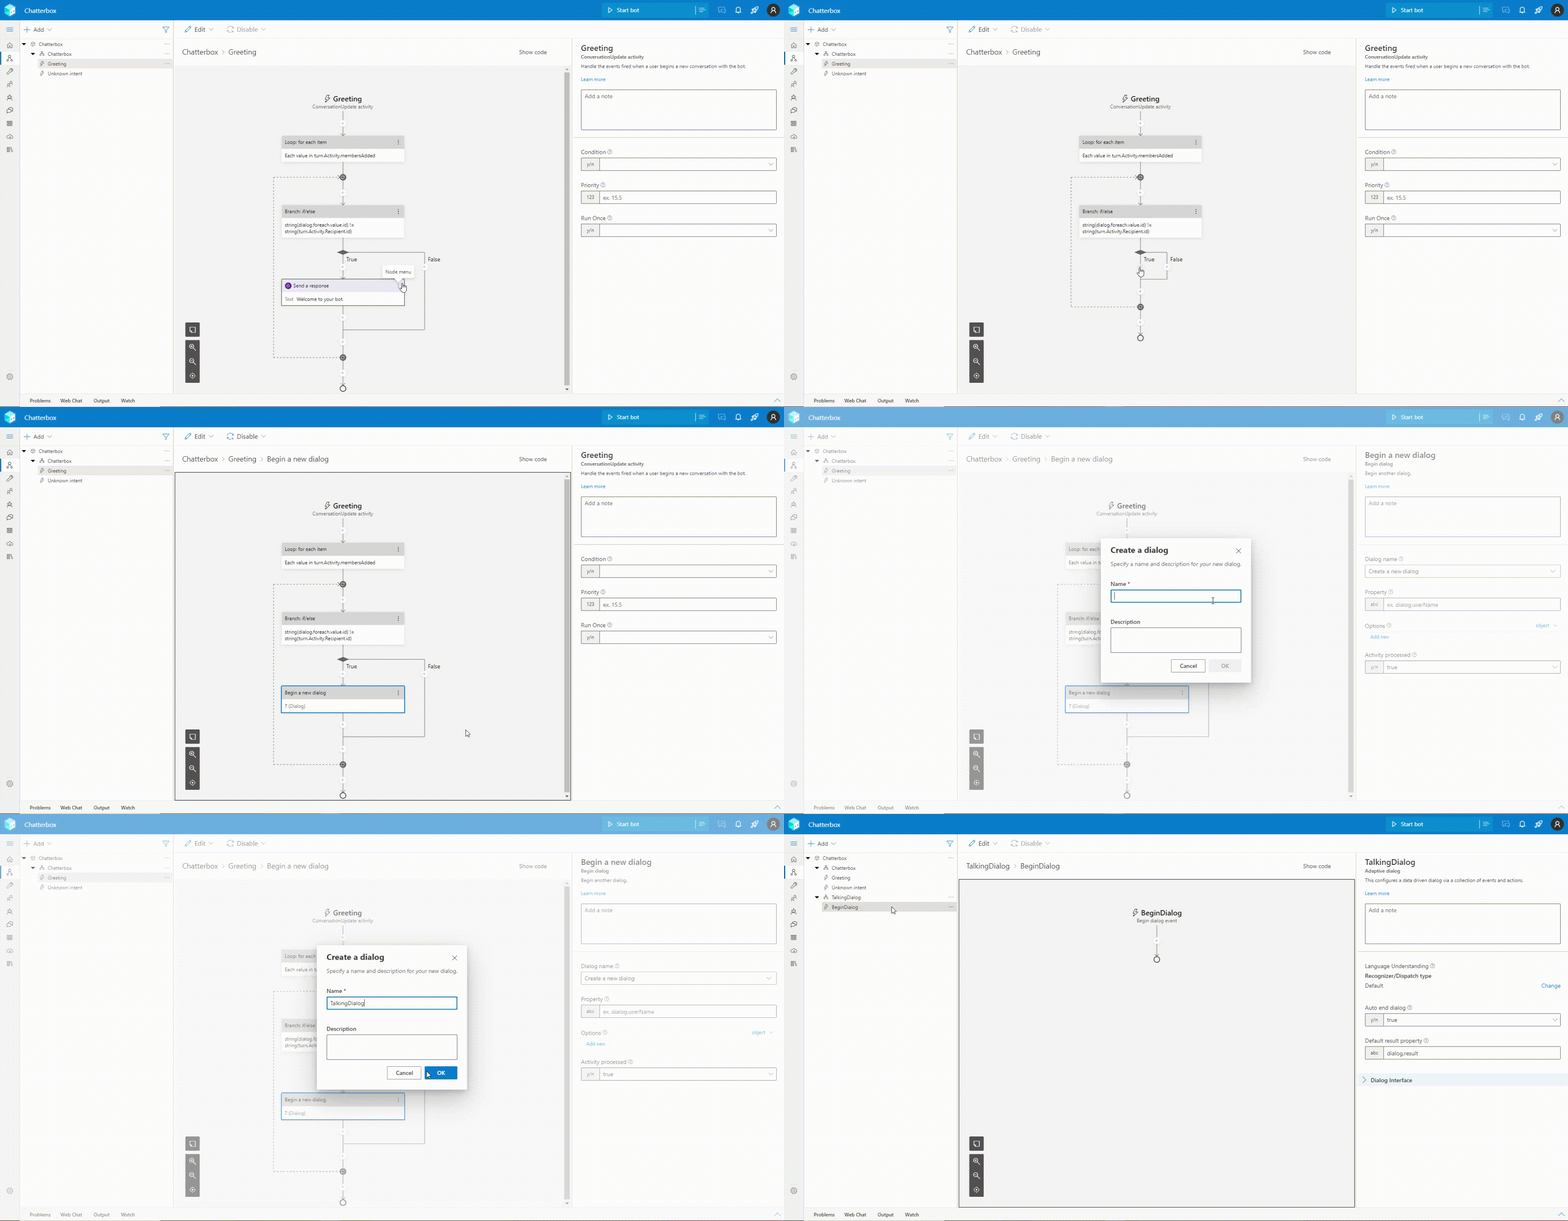 Now in TalkingDialog, you first have to create an experience that'd keep asking question after one another. As Bot Framework Composer lacks a while loop functionality for now therefore, we'd try to achieve this using some basic properties (such as dialog.isLaunched) and adding two question (text) prompts. Note that isLaunched property needs to passed as option from the Greeting trigger.
Then, you just have to add a text prompt. In the text prompt, you'd write a simple introductory message. I am writing the exact same message as I'd pass it to the API. On the input section, you can see that I'm setting up a property user.question which means that whatever user will write in response to the introductory message (which is kind of a question, but not really) will be stored in that property. This response of a user is actually considered as a question for the OpenAI's API. Then after receiving a response from the API (which is an answer in our case), that response will be set as a text prompt again. As soon as user asks another question, the Repeat this Dialog action will be called and it will then follow the different path rather than going into the introduction one.
Below video clip may help. 🙂
[video width="816" height="934" webm="/uploads/2021/08/Dialogflow_1.webm" loop="true" autoplay="true"][/video]
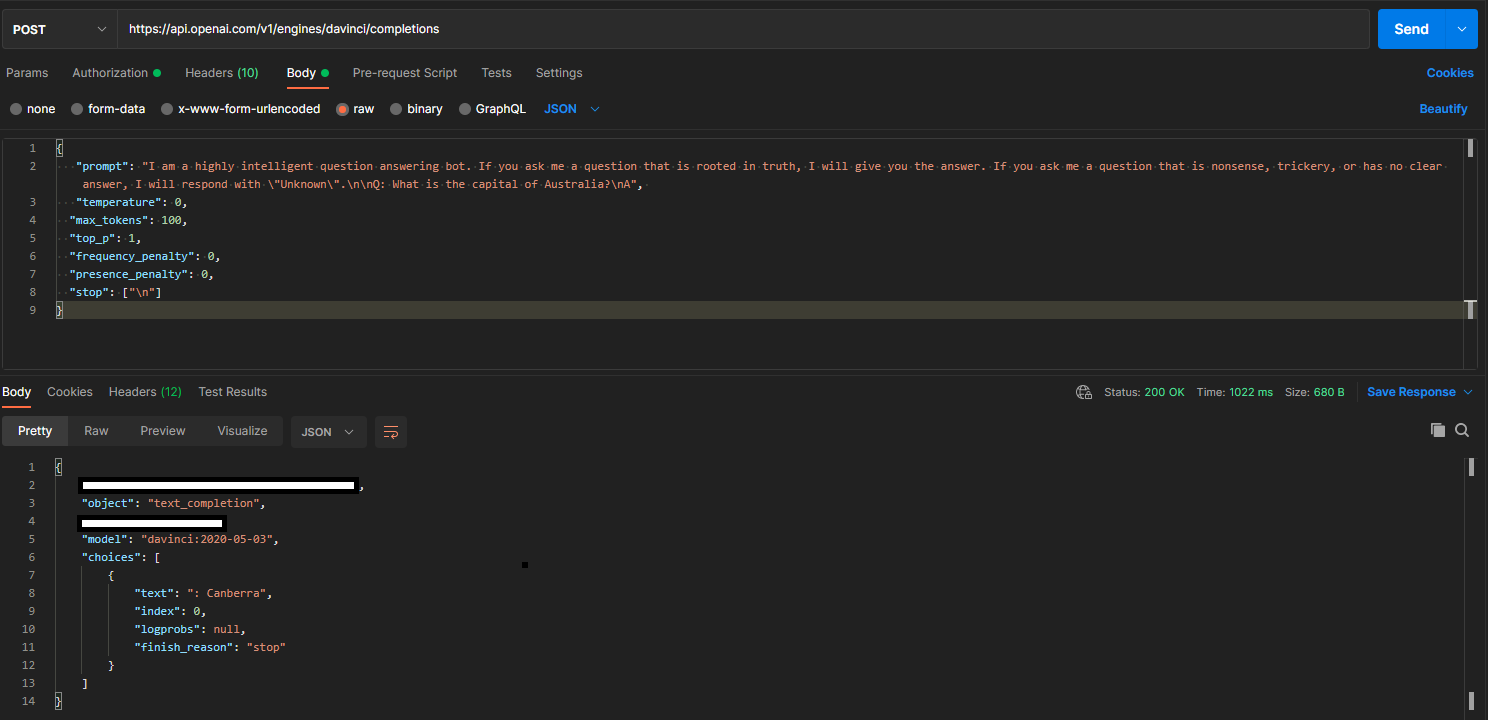 In our case, we're not doing it because we're just sending question and receiving an answer and showing it to the user. Now, let's see what's going on inside the Send an HTTP Request action. This is the place where we're filling in the request and sending it to the OpenAI's API. Purposefully, I have tried to avoid any variables, just to show you the raw request rather than keeping it in a object. You can see that I am passing user.question dynamically into the prompt. Also, in header, I am filling up with Content-Type and Authorization keys. This is how you can pass the authenticated request.
Note: I've removed the authentication key on purpose.
[video width="1292" height="998" webm="/uploads/2021/08/HttpAction.webm" loop="true" autoplay="true"][/video]
The response is store in dialog.result and with the little string manipulation, I am able to send it back as a prompt to the user.
This is how it is going to look in the Webchat / Emulator.
[video width="506" height="988" webm="/uploads/2021/08/Webchat-Emulator.webm" loop="true" autoplay="true"][/video]
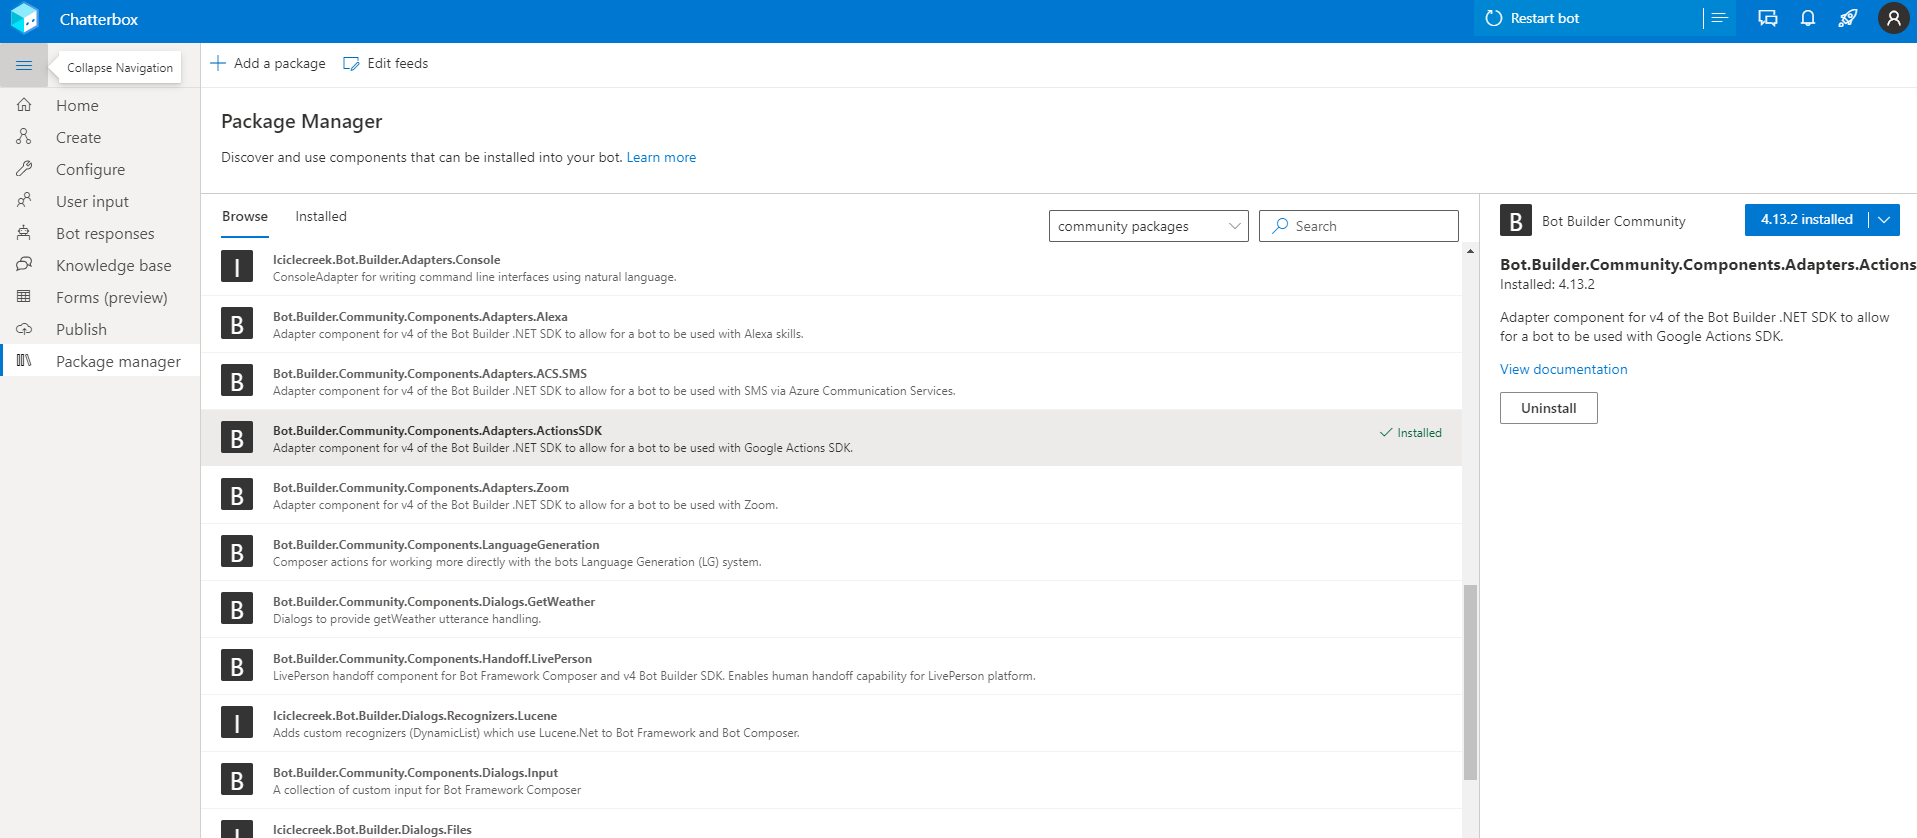 So, in this post, I'm going to talk about adding an opensource community component of Google Actions SDK. This component is powered by the Actions SDK adapter which is primarily built by Gary Pretty (big thanks to him). Once you're in the Package Manager section, find Bot.Builder.Community.Components.Adapter.ActionsSDK and click on install on the right.
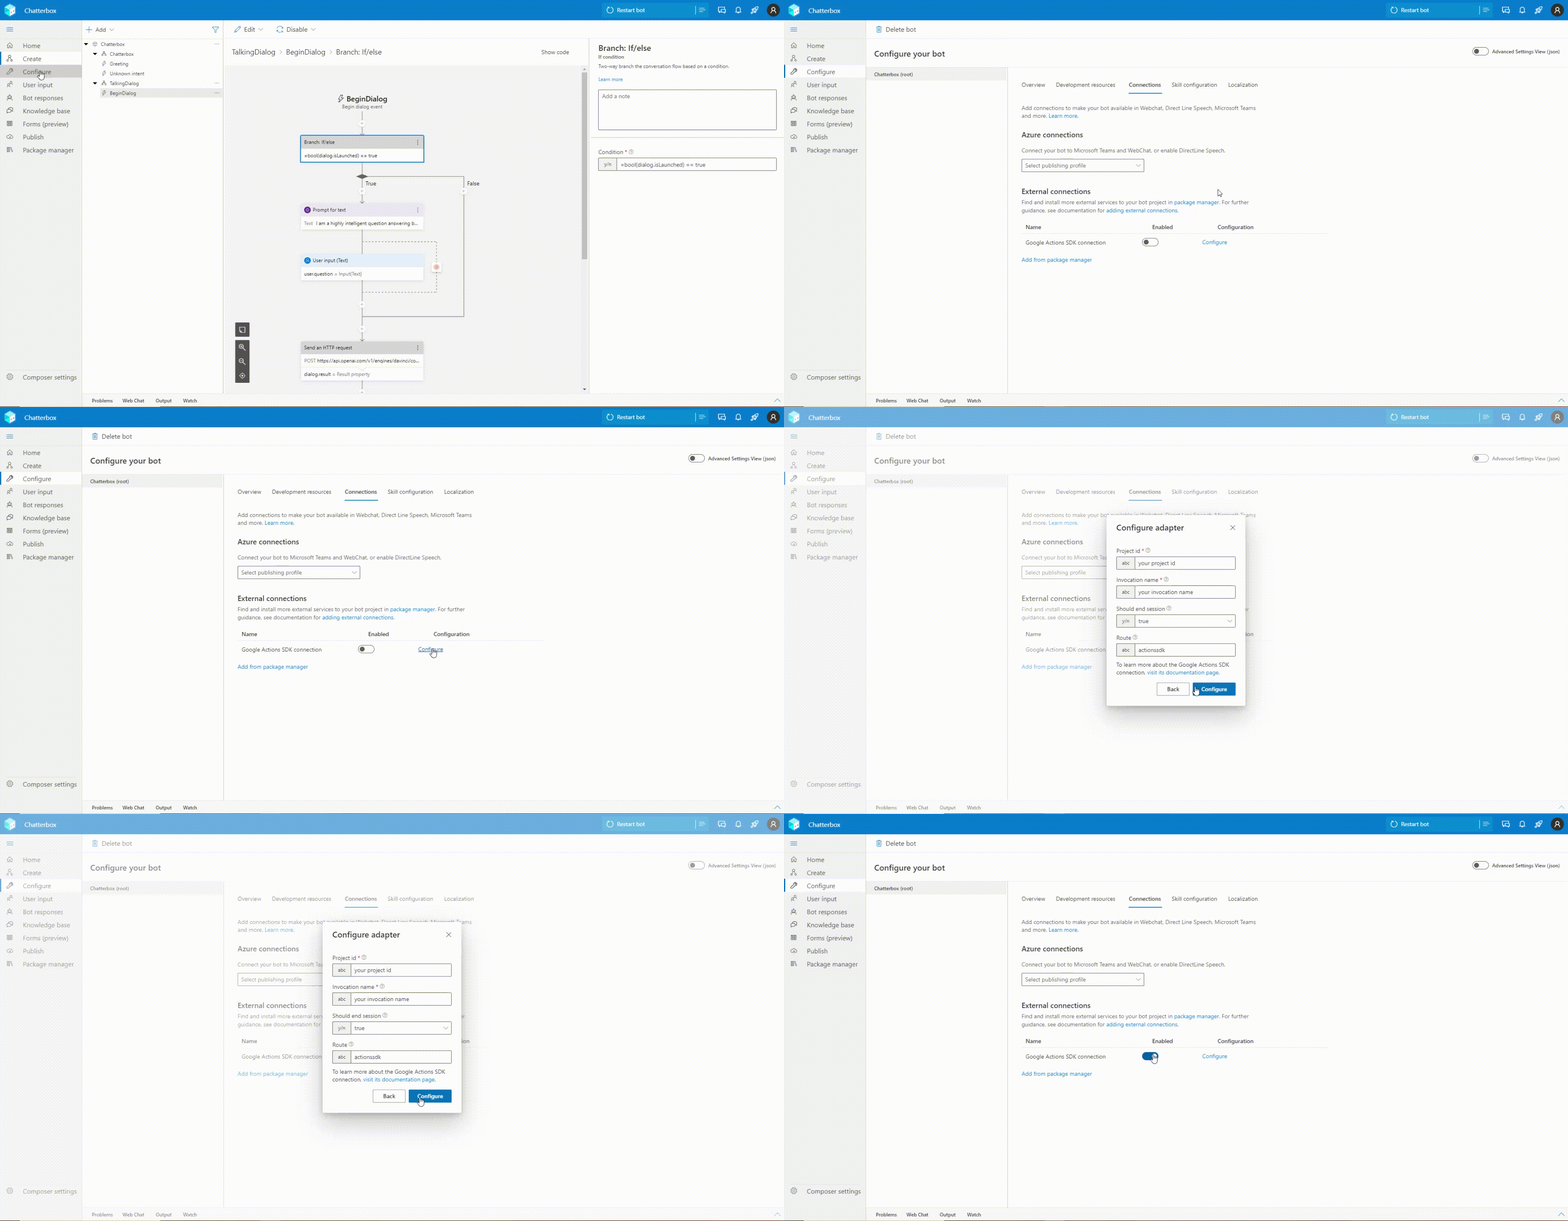 If you're like me who is running this bot locally for testing purposes (or haven't really made up a mind to publish this action) then you may want to use ngrok as this will give you an ability to test complete functionality of your bot by running it completely local. This doc covers everything around it. Once you've setup the tunnel of your local port with ngrok then you can copy that link of your bot and set it to the Webhook url of your Google Action.
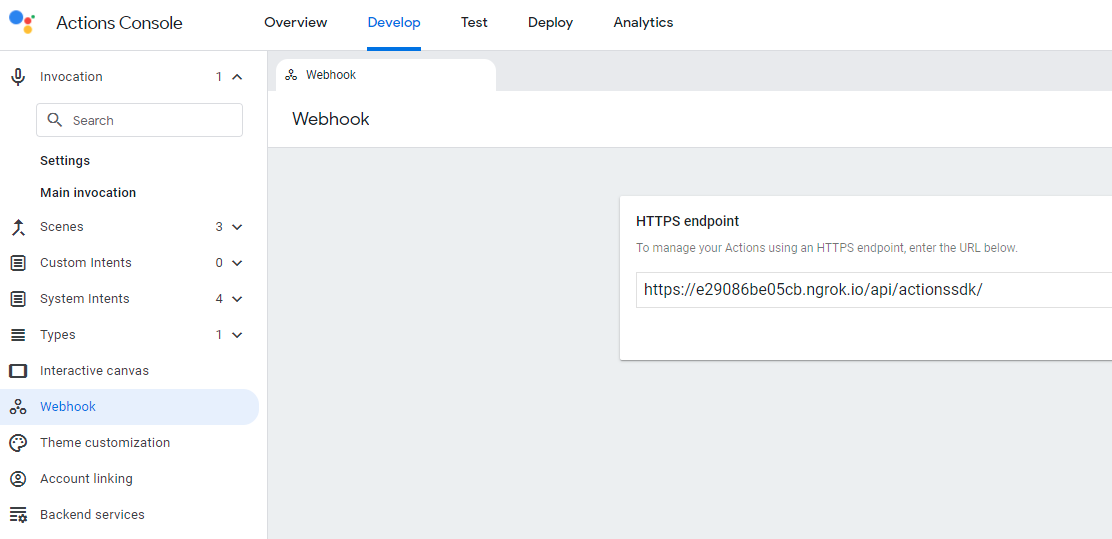 Now! You're absolutely OK to test your Bot with your Action. Click on Start (or Restart) bot in your Composer and move to your Google Actions.
We're still in the lockdown and already ran out of all kind of combinations of games we had to play our little one, so I thought to build something for her, at least we can now get to the point, one liner answers from Google Assistant.Unlike many other AI systems which are designed for one use-case, OpenAI’s API today provides a general-purpose “text in, text out” interface, allowing users to try it on virtually any English language task. GPT-3 is the most powerful model behind the API today, with 175 billion parameters. There are several other models available via the API today, as well as other technologies and filters that allow developers to customize GPT-3 and other language models for their own use.
In this post, rather than going into the details of API and their offerings, I'd take you through how easily you can connect your bot built using Microsoft Bot Framework Composer and surface OpenAI's capabilities to your customers. While there can be many use-cases ranging from the classification to QnA to key points extraction, I'd keep it quite simple and just add the chitchat capability which involves questions and answers functionality of OpenAI's famous model called Davinci.As of today, the API remains in a limited beta as OpenAI and academic partners test and assess the capabilities and limitations of these powerful language models.(Updated 28 Dec, 2021)
Davinci is the most capable engine and can perform any task the other models can perform and often with less instruction. For applications requiring a lot of understanding of the content, like summarization for a specific audience and creative content generation, Davinci is going to produce the best results.The API works in a unique way and to build a whole conversation around that needs a few tricks with the Composer but we'll talk about that after the bot's part.
The real part, Chatterbox
Now, let's focus on our main motive of this post; to integrate OpenAI's API with Bot Framework Composer bot which we call Chatterbox. This will try to answer any question you'd put in your chat window or speak to your favorite smart assistant (Google or Alexa). In order to achieve this, you need to have an API key. Hold on, if you do not have it, it still is good for you to continue reading this post. Why? Because you'll learn about integration of any authenticated API along with connecting your bot with Google Assistant. Yes, you read that right, we'll also integrate it with the Google Assistant (Alexa is easier though).It's assumed that you're familiar with Bot Framework Composer and the basic concepts of creating a good experience with chatbots.Once you have the API key, you first have to go to the Guides section of OpenAI's Documentation, skim it and move to the Completion section of your API reference. Over there, you will learn about the API specification such as endpoint, verb, request and much more. Protip: Copy the example request for usage, tailor it according to your needs later. After going through the docs, open up the Bot Framework Composer, create a new empty Bot. Remove Send a response action and add Begin a new dialog action instead. This will help you create a new dialog (you can name it as TalkingDialog) and then you can start working in that particular dialog. Please note that this is not the best way to create your bots and you may want to add some natural language capabilities to your bot. It is also possible that your bot may have some sophisticated / complex flow such as ordering food, tracking a parcel and so on. The main reason I did is to demonstrate you the working of API rather than connecting it with any NLP services or building some sophisticated capabilities into this bot.
 Now in TalkingDialog, you first have to create an experience that'd keep asking question after one another. As Bot Framework Composer lacks a while loop functionality for now therefore, we'd try to achieve this using some basic properties (such as dialog.isLaunched) and adding two question (text) prompts. Note that isLaunched property needs to passed as option from the Greeting trigger.
Then, you just have to add a text prompt. In the text prompt, you'd write a simple introductory message. I am writing the exact same message as I'd pass it to the API. On the input section, you can see that I'm setting up a property user.question which means that whatever user will write in response to the introductory message (which is kind of a question, but not really) will be stored in that property. This response of a user is actually considered as a question for the OpenAI's API. Then after receiving a response from the API (which is an answer in our case), that response will be set as a text prompt again. As soon as user asks another question, the Repeat this Dialog action will be called and it will then follow the different path rather than going into the introduction one.
Below video clip may help. 🙂
[video width="816" height="934" webm="/uploads/2021/08/Dialogflow_1.webm" loop="true" autoplay="true"][/video]
What's in the API?
The API is super simple which is authenticated with the bearer (key); the docs are really well-written and contain many examples. However, it gets a little tricky when it comes to sending prompts. The reason of that is, it expects a newline (\n) escape sequence, as well as the prefix such as Q and A. This is different for different kind of use-cases. Such as for lengthy, contextual chats, you may have to set prefixes as Human and AI. This is all good when you're sending a request using clients like Postman (example below). However, it gets really tricky when you have to keep the last prompt, concatenate with the new one and then send it again and repeat. This is valid (and working) for the case when you want to build some contextual conversation. In our case, we're not doing it because we're just sending question and receiving an answer and showing it to the user. Now, let's see what's going on inside the Send an HTTP Request action. This is the place where we're filling in the request and sending it to the OpenAI's API. Purposefully, I have tried to avoid any variables, just to show you the raw request rather than keeping it in a object. You can see that I am passing user.question dynamically into the prompt. Also, in header, I am filling up with Content-Type and Authorization keys. This is how you can pass the authenticated request.
Note: I've removed the authentication key on purpose.
[video width="1292" height="998" webm="/uploads/2021/08/HttpAction.webm" loop="true" autoplay="true"][/video]
The response is store in dialog.result and with the little string manipulation, I am able to send it back as a prompt to the user.
${substring(dialog.result.content.choices[0].text, 2, length(dialog.result.content.choices[0].text) - 2)}
Surface your Bot to Google Assistant
In my last post, I've talked about the Bot Framework Component model. This has added a whole set of new capabilities to the Composer. You can now use nuget or npm packages to your bots, without writing any code or moving away from the Composer. In your Composer client, you can go to Packages area to add multiple first party and community (third party) packages. You can also build it locally and add them to your bot (this is out of scope for this post so I will skip it). So, in this post, I'm going to talk about adding an opensource community component of Google Actions SDK. This component is powered by the Actions SDK adapter which is primarily built by Gary Pretty (big thanks to him). Once you're in the Package Manager section, find Bot.Builder.Community.Components.Adapter.ActionsSDK and click on install on the right.
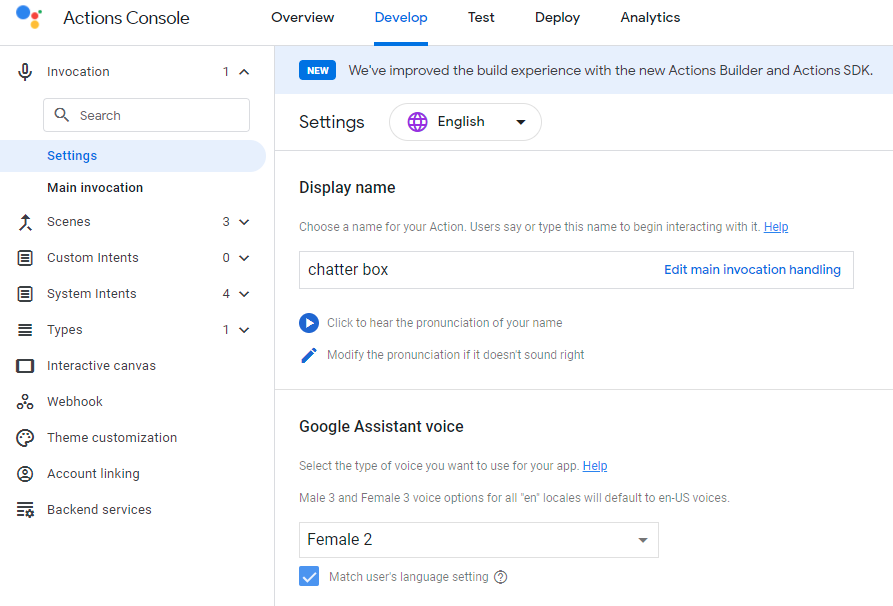
Bot Builder Community is a collection of repos led by the community, containing extensions, including middleware, dialogs, recognizers and more for the Microsoft Bot Framework SDK.Before moving any further with the Package or the Bot, let's look at the Google Actions which will be used to communicate with your Google Assistant. So instead of re-inventing another guide or if you do not know what Google Actions are and how you can use them with your Bot Framework Composer bot, I'd recommend you to follow this comprehensive guide. Follow this till the 8th point of Configure your Actions SDK Project. Once you're done configuring your project, you may see all the options (left-hand side) like below in your Action.

If you still get stuck in any way of creating Google Actions for your bot then please let me know in the comments and I'll be happy to help you out.Let's go back to our Bot Framework Composer bot and add the configurations to your Action. 🔧
 If you're like me who is running this bot locally for testing purposes (or haven't really made up a mind to publish this action) then you may want to use ngrok as this will give you an ability to test complete functionality of your bot by running it completely local. This doc covers everything around it. Once you've setup the tunnel of your local port with ngrok then you can copy that link of your bot and set it to the Webhook url of your Google Action.
 Now! You're absolutely OK to test your Bot with your Action. Click on Start (or Restart) bot in your Composer and move to your Google Actions.
Actions Simulator 👎 - Google Assistant 👍
The experience with the Simulator is quite limited (read: bad) and that's why I never recommend you to test your bot with that. Once you're done with the first or second response of your bot, you must test it with the actual assistant. [video width="1916" height="968" mp4="/uploads/2021/08/GoogleAction-Test.mp4"][/video] You do not necessarily need a Google Nest Hub or Home to work with this. It's just that I have one so I love using it. If you own an Android device (or even an iPhone), you can still use Google Assistant.My use-case was more of an educational but as you can see, it is good enough to work with any industry and on any scale. Therefore, solving customer service problems, extracting useful information or tailoring the whole experience for your business shouldn't be a big problem.OpenAI has been really fruitful for the scenarios I have used here and offline and when it is combined with tools like Bot Framework Composer, it can surely bring the game changing experiences to the different business verticals. I'd be happy to see your comments on your thoughts and challenges if you have come across with this one, so far. Until next time.
