Back in 2016,
Bot Framework v3 SDK used to have a famous feature called
FormFlow. The beauty of FormFlow was its simplicity for basic conversational flow. You just had to define a class with some options as enum and call a function to create the whole guided flow,
automatically. Many developers loved it (
esp. that sandwich bot) because of its simplicity and quick implementation but it was not super good because of the limitations and complex nature.
However, with the advent of Bot Framework v4.0 SDK, the FormFlow was discontinued till v4.9 SDK when we saw something similar popped up in the release notes as
Dialog Generation. This hinted us of the similar (yet much improved) feature with rich capabilities. As it was a pro-dev and
experimental thing - the SDK team kept improving and changing it timely. And since it was coupled up with language understanding, language generation and dialog management, the complexity was later simplified by releasing it as
Bot Framework CLI plugin (
same as Chatdown and the likes). It got a little better but only for those who are pro developers and understand the Bot Framework concepts.
If you're more interested in learning in depth about the pro dev capability of Dialog Generation then please let me know either by commenting or connecting with me on twitter.
Composer to the rescue ⛑
On December 15, 2020, Bot Framework Composer team released a new
version 1.3.0 with so many fantastic features that each of them demands a separate blog post. Having said that, considering the objective of this post, we will only discuss one of those features known as
Form Dialogs Preview
Form Dialogs is a new feature in Bot Framework Composer that allows you to create the dialogs assets (by leveraging the above discussed Dialog Generation API) consisting of conversational flow, LU models and the bot responses.
All without writing a single line of code!
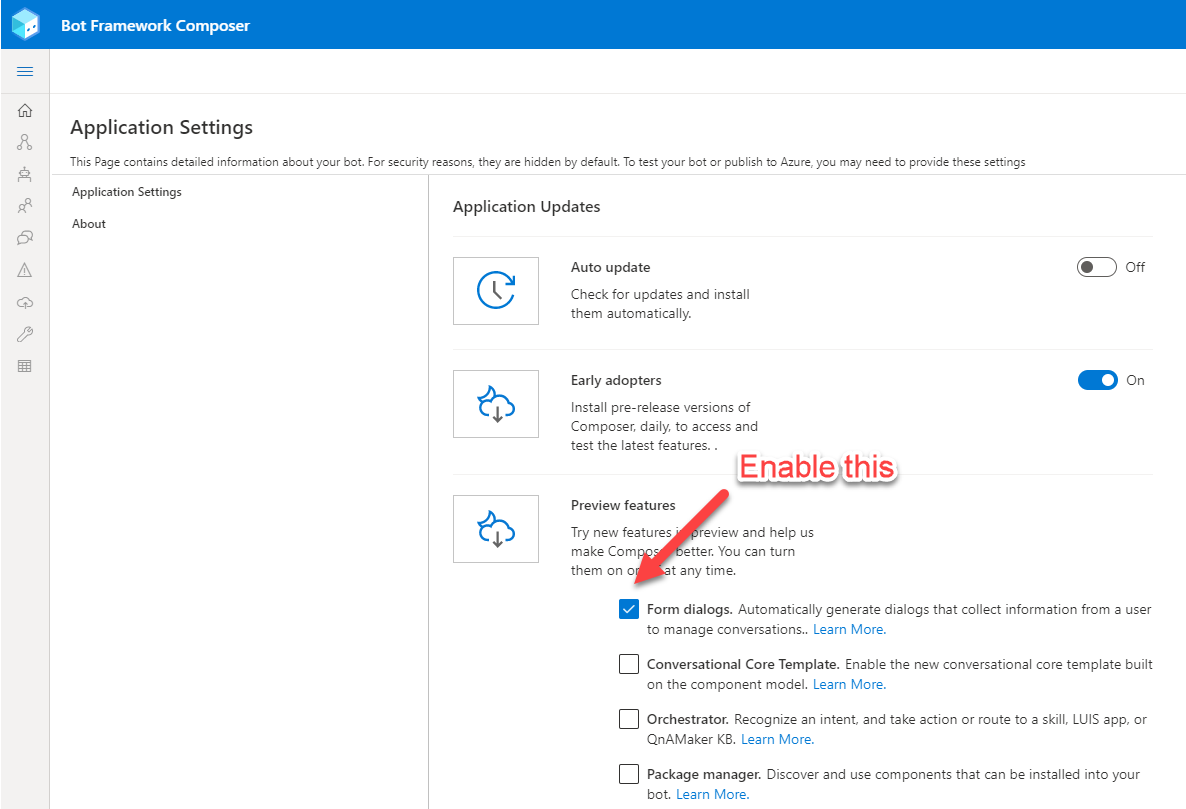
As this feature is currently in preview, you may have to enable it from the Settings. Let's see how can do that and create an automatic conversational flow by adding a Form.
Earlier in FormFlow, you could add the sequential logic perfectly as well but the interruption handling and modification of existing logic was not simple at all. The FormDialogs have made it super simple for anyone to play with that!
And.. what is a Form?
Form (
as the name suggests) defines a set of properties your bot is going to use along with the values which is acceptable to respective property. These properties can be defined as a list of values or as types such as phone number, date, email address, string and so on.
In order to add the Forms, you must locate a Forms (preview) right below your Project Settings. Then you will be presented an empty screen with a + sign of adding a schema to it. Schema keeps the information of all your properties, its values, types and priorities into a json format. Click on the + sign to add your schema and give any name. I'd name it as
Cookies.
You can then add the properties you want to include as a part of your dialog. In my case, as I am building a bot to take an order for cookies; I'd include the below properties and their respective types;
- Name - type: string
- Email - type: email
- Count - type: integer
- Date - type: date
- Type - type: list
As you may notice, the form window is divided into two parts, required properties and optional properties. Required Properties, as their name suggests *must* be provided to bot whereas Optional Properties can be accepted if provided otherwise they are ignored by the bot.
Another cool part of this is you can drag and move the properties to set their priority. Priority defines the order in which a bot will inquire about the properties from the user.
Once you're done with setting up properties, you can simply click on Generate Dialog button on top right and it will then create the Dialog for you which can be seen from the design section.
If you're curious then you can also sneak peek into the Show Code 😉

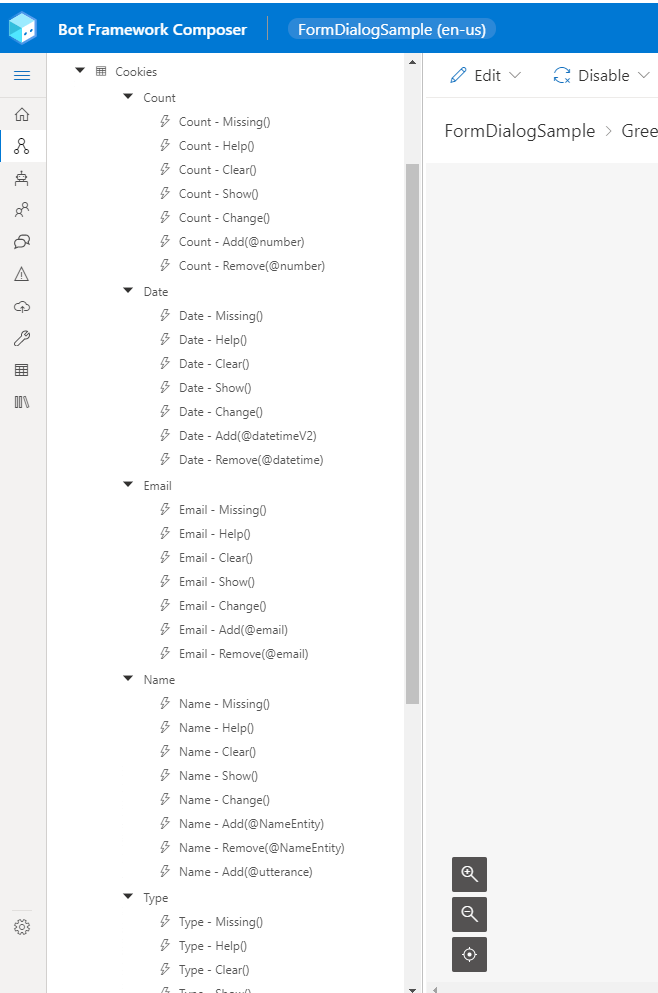
Once the Form Dialog is created, you can see on the left side of your design panel that it has created a couple of triggers. Each trigger is meaningful.
| Triggers |
Descriptions |
| Missing |
When the value is missing, the bot asks for the value from the user |
| Help |
To handle better interruption, this is triggered when the user asks for help even in the middle of conversation |
| Clear |
When user asks to clear up the value of the property |
| Show |
Shows property and its value |
| Change |
This will enable bot to ask the user to change the value of the property |
| Choose |
This is triggered when bot finds an ambiguity and asks from the user to choose the value from multiple (acceptable) values |
| Add |
When the response is expected after Missing trigger or unexpected by the bot. It confirms and |
| Remove |
When user asks to remove a value from the property. It sends the confirmation and removes it. |
Now.. before we get into its execution. Let's explore a few more things about Form Dialogs. In the Forms (preview) menu, where you're defining schema, you must have noticed that in addition to the
Add Property option, you also have
Import Schema and
Export JSON. They both are quite self explanatory but the interesting part is
Import Schema where you just have to provide any existing schema (.form) file and it's going to all the properties etc. very seamlessly. For the sake of this example, I am going to use the
Sandwich schema.
Pro Tip: When you're importing, Bot Framework Composer looks for the .form extension where as the file is of .schema extension, so just ensure that you're looking for All Files (*)
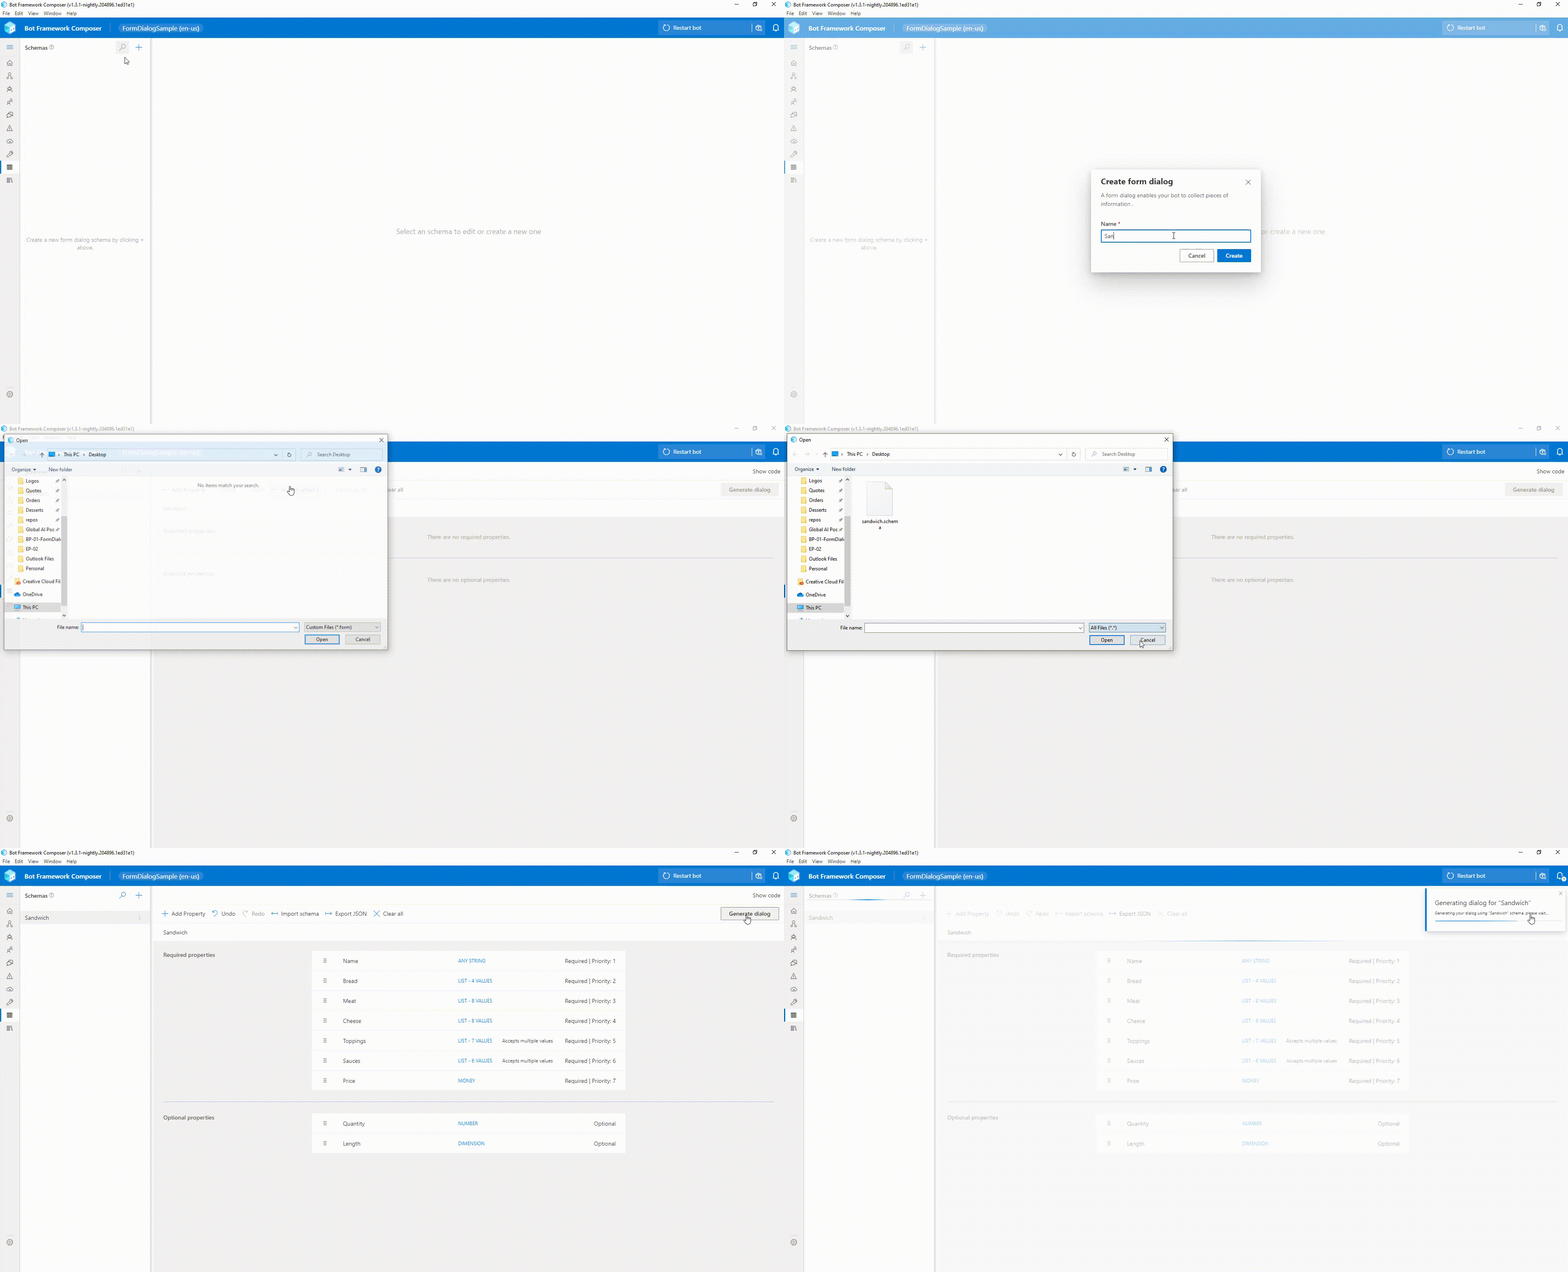
Now let's test this in Emulator and see how does it work. If you notice, in case of any ambiguity, it asked me for a specific input, such as which type of sauces do I want, same is the case for toppings.
This is really cool 😎
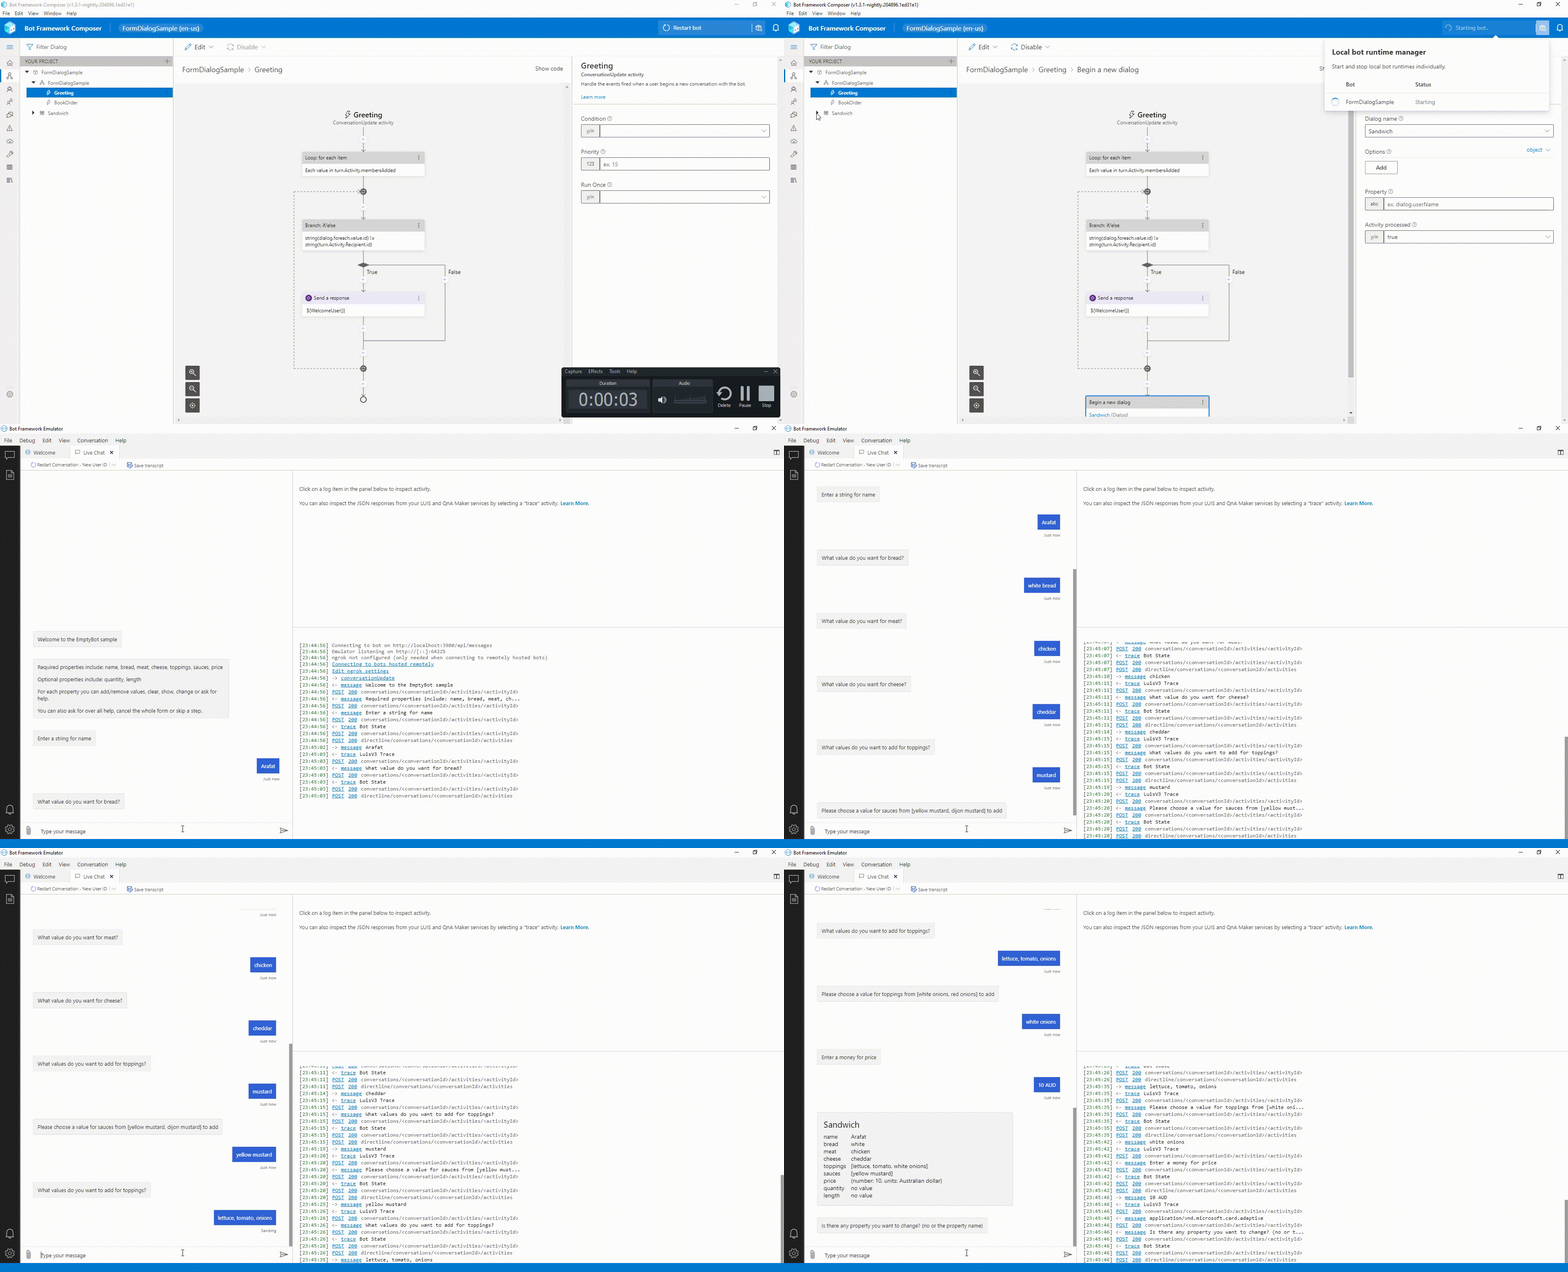
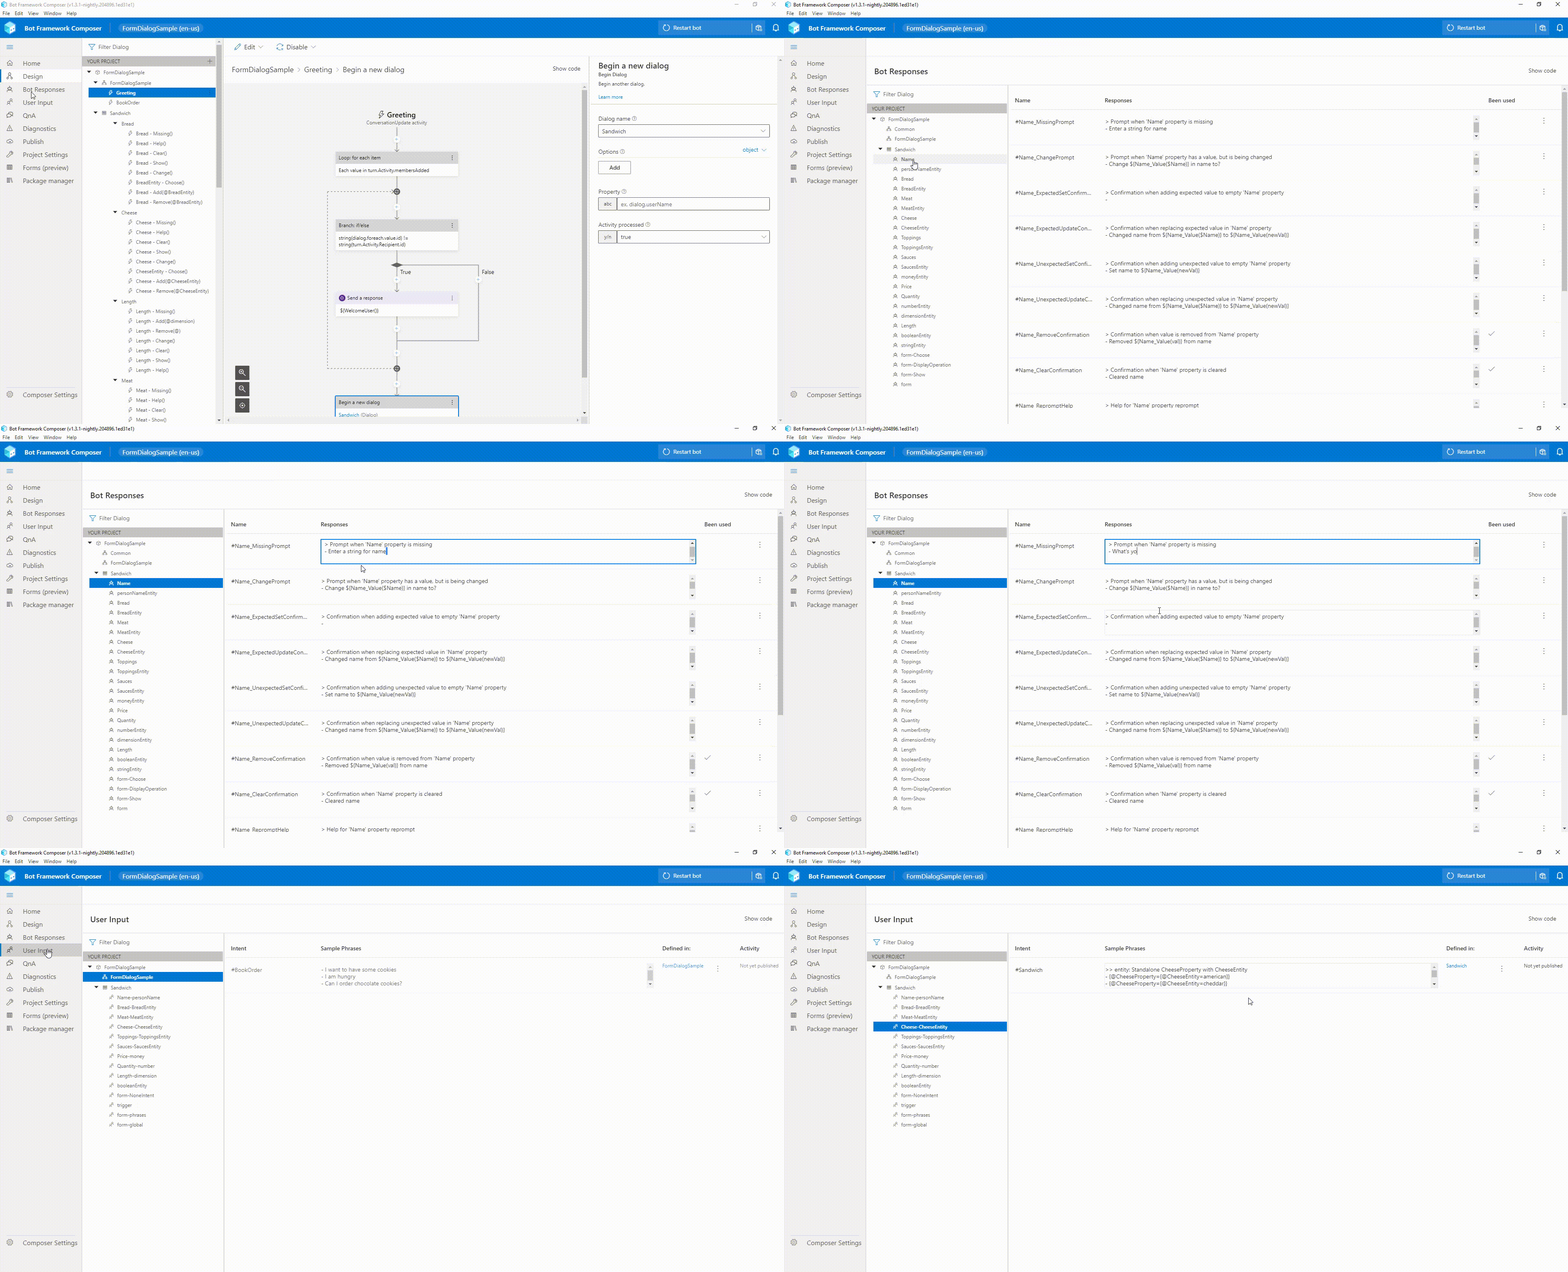
You may notice that the questions text from the bots are not super helpful. These can be changed by going into the Bot Responses and you can tweak them. In addition to this, you can also change the User Inputs from Language Understanding models by going to the User Inputs.
As this feature is still in Preview therefore I think it can be improved in many ways. Nevertheless, I am happy to see it coming back with many latest capabilities and equally excited to see what it can do in future.
Until next time.

 Once the Form Dialog is created, you can see on the left side of your design panel that it has created a couple of triggers. Each trigger is meaningful.

 Now let's test this in Emulator and see how does it work. If you notice, in case of any ambiguity, it asked me for a specific input, such as which type of sauces do I want, same is the case for toppings. This is really cool 😎
 You may notice that the questions text from the bots are not super helpful. These can be changed by going into the Bot Responses and you can tweak them. In addition to this, you can also change the User Inputs from Language Understanding models by going to the User Inputs.
 As this feature is still in Preview therefore I think it can be improved in many ways. Nevertheless, I am happy to see it coming back with many latest capabilities and equally excited to see what it can do in future.
Until next time.
 Once the Form Dialog is created, you can see on the left side of your design panel that it has created a couple of triggers. Each trigger is meaningful.

 Now let's test this in Emulator and see how does it work. If you notice, in case of any ambiguity, it asked me for a specific input, such as which type of sauces do I want, same is the case for toppings. This is really cool 😎
 You may notice that the questions text from the bots are not super helpful. These can be changed by going into the Bot Responses and you can tweak them. In addition to this, you can also change the User Inputs from Language Understanding models by going to the User Inputs.
 As this feature is still in Preview therefore I think it can be improved in many ways. Nevertheless, I am happy to see it coming back with many latest capabilities and equally excited to see what it can do in future.
Until next time.